
Wild yeast exists all around you, and one of the best sources for it is dried fruit. Just slip a few pieces into a jar, fill it with water, and wait. In less than a week you'll have a bubbly jar of yeast water ready to use for bread baking.
Unlike sourdough starter, wild yeast captured through this method requires no daily maintenance; rather, it's a one-step process, a few days of patience coupled with observation, and you're ready to bake.
What is wild yeast?
Wild yeasts are single-celled organisms that exist all around you. They feed on carbohydrates, and as they do so they release carbon dioxide, B vitamins, and alcohol. Because they release carbon dioxide, yeast can leaven bread, and because they convert carbohydrates to alcohol, brewers use yeast to make beer and wine, too.
Traditionally, all brewing and baking used wild yeast - or the yeast found in the natural environment on your skin, in flour, on grains, and in the home.
With time, brewers and bakers cultivated these wild yeasts and, in the 19th century, chemists were able to isolate and domesticate certain strains from the yeast species saccharomyces cerevisiae, which is what you find in packets of baking yeast today.
Where does it come from?
Like bacteria and other microorganisms, wild yeasts live all around you. They live on the surfaces of your home, on your skin, on your fruit and vegetables, in your flour.
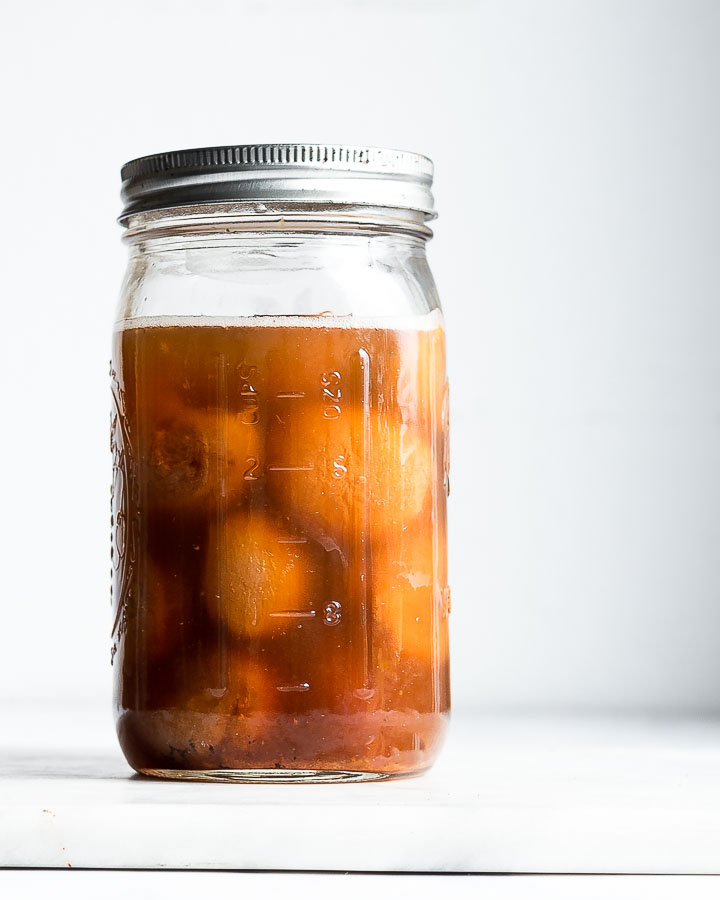
Knowing this, you can create an environment that encourages their growth: one that is moist and carbohydrate-rich. Tossing a few pieces of unsulphured dried fruit into a jar and pouring in water does just that. In less than a week, that jar will fizz and bubble with activity, and your yeast water is ready for baking.
While capturing wild yeast for brewing and baking is an age-old practice that spans millennia across cultures, this particular technique of preparing a yeast water starter with fruit, herbs, and other plant matter is rooted in Japanese artisan baking, and popularized by Junko Mine who wrote about her method here.
How do you know it's ready?
Making a wild yeast water starter seems almost too easy. It feels like the process should be more complicated than tossing fruit in a jar of water and simply waiting. But that's it. That's all you need to do.
Within the first day, the dried fruit will plump as it absorbs the water. By the second day, the fruit will release its color into the water. Apricots release an amber color, raisins a reddish-brown, and Calimyrna figs turn the water a sandy straw yellow.
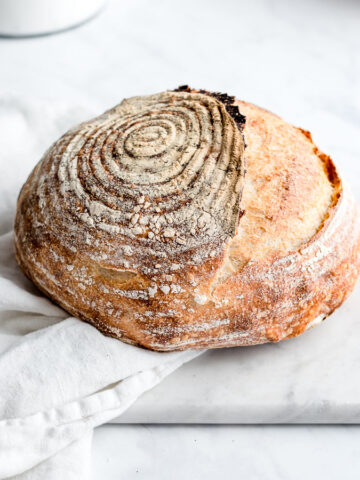
As each day progresses to the next, you'll see the water turn cloudy - a sure sign that the wild yeast are doing their work. And by day five or six, you'll see tiny bubbles appear at the surface of the water. Then you know your yeast water is ready.
Tips for making your yeast water
- Start with dried fruit. You can capture wild yeast easily from a variety of sources. I've used cherry tomatoes, fresh peaches, spruce tips, and plenty of dried fruit. But, for first-time success start with dried fruit.
- Use unsulfured fruit. Check the ingredients of your dried fruit to make sure it doesn't contain sulfur dioxide. Sulfur dioxide is a chemical that helps preserve the color of dried fruit, but it's linked to asthma symptoms in susceptible people. It is also antimicrobial and may compromise yeast production.
- Seal the jar tightly. Sealing your jar tightly supports the growth of wild yeast.
- Watch for bubbles and other signs of readiness, as they'll let you know when it's safe to bake.
- Use it quickly once bubbles appear. If you continue to let it ferment after it's ready, the carbon dioxide in the jar may build up and cause an explosion which is decidedly messy and potentially dangerous.
- Try fresh fruit and herbs, once you've made a few starters using dried fruit.
How to Use It
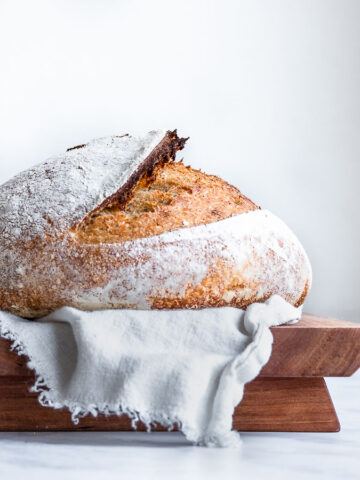
When your starter is ready, it's time to bake. This recipe for wild yeast bread is a great place to start.
There are a few things to keep in mind. First, remember that your yeast really is wild. Accordingly, it lacks the consistency of domesticated yeast strains. Rise times will vary considerably and usually take considerably longer than with commercial yeast.
Second, strain your yeast water into a clean jar. You can use this in place of the liquid portion of your recipe and omit any baker's yeast that your recipe calls for.
If your recipe calls for more liquid than you have, then use all the yeast water and add more liquid to meet the recipe's guidelines. If your recipe calls for less, only use the amount called for in the recipe.
Lisa says
Exactly when is the Wild Yeast starter ready to bake bread? Small ring of bales showing, no lid budging. Water is mostly foggy. Thank you
Jenny says
Hi Lisa,
Please read this section: https://nourishedkitchen.com/wild-yeast/#ready
Nicole Franks says
Would it be ok to just drink? I already have a sour dough starter that we all love. If it’s not edible as just a beverage, do you have a recipe on how to make it as a bread?
Jenny McGruther says
Hi Nicole,
Yes, many homemade sodas can be started with yeast water. Sandor Katz' book, The Art of Fermentation, describes a yeast water made with raspberries that is drunk like soda; however, it's not called "yeast water." The technique is the same though.
Jackie says
Can I make the wild yeast starter with fresh apples? I have an abundance of them right now!
Jenny McGruther says
Hi Jackie -
Yes, you can.
Andy says
Great recipe.
Mike Wurlitzer says
I've had great success with Wild Yeast Water in place of my sourdough starter, which is fantastic in Rye bread, but we don't care for the sour taste in other breads. Here is, IMO, where Wild Yeast Water is stellar.
I've made many loafs with great rise and little sour taste using WYW.
My question: I've yet to see any information how long and HOW you can keep this going without waiting another 5+ days for a new batch of WYW.
I've kept Raisin WYW going for a month by adding more raisin's but I have no clue as if that is the right way to do this.
Jenny says
How long you can keep it going is dependent on so many factors - what you feed it, how often you feed it, how much you take out. It's something to experiment with on an individual level in your kitchen. For most people, wild yeast water's benefit is that you don't need to maintain it (unless you want to).
Blimi says
You can keep it in the fridge. Take it out for 24 hrs and feed it with a teaspoon of sugar when u want to use it again
Deborah says
My yeast water has been (brewing) for about 10 days. The fruit is plump and the water murky but I have very few bubbles and it doesn’t seem fizzy. I was expecting a similar fizz to my kombucha. How do I know if it’s fizzy enough to work in the bread?
Jenny says
Hi Deborah,
If it's been brewing for 10 days, especially in summer, it's probably been too long. It should be about 5-6 days, and the bubbles are tiny - about what you'll see in the picture.
Paul Siami says
What to do with the strained fruit? Dump it? Use it again?
Jenny says
You can chop it up and add it to the bread if you like. I've had some success with using it twice, but that's not always consistent. Usually, I dump it in the compost bin.