• Skip to primary navigation
  • Skip to main content
  • Skip to primary sidebar

Nourished Kitchen

  • Get Started
  • Nourishing Recipes
  • Cookbooks
menu icon
go to homepage
search icon
Homepage link
  • Getting Started
  • Nourishing Recipes
  • Vibrant Botanicals
  • Cookbooks
  • Easy Swaps!
    • Facebook
    • Instagram
    • Pinterest
  • ×

    Nourished Kitchen » Winter Fruit Recipes » Homemade Coconut Milk

    Posted: Dec 4, 2020 · Updated: Dec 9, 2020 by Jenny McGruther · This post contains affiliate links.

    Homemade Coconut Milk

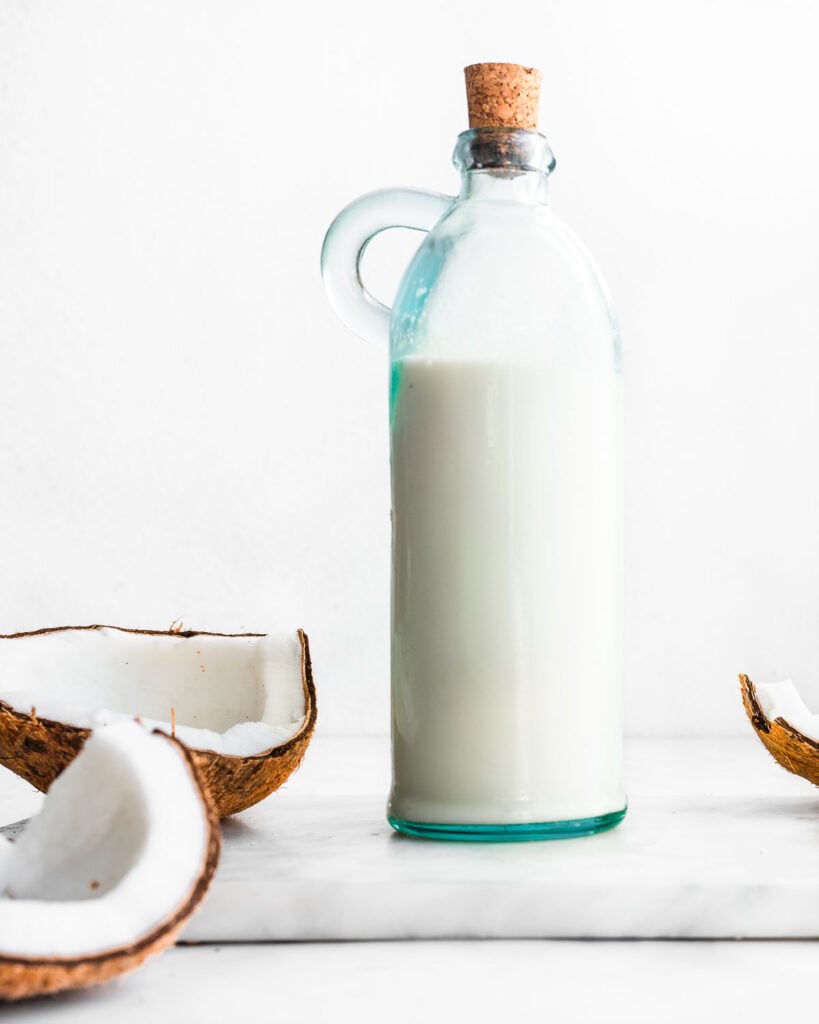
    Homemade coconut milk tastes fresh and delicate with a rich component thanks to the plentiful natural oils it contains, and more delicious than any canned variety you can buy at the store. It's also easy to make with a little time and patience.

    Jump to Recipe | What is it? | How's it made? | Tips | Variations

    A bottle of homemade coconut milk next to a cracked brown coconut

    What is it?

    Coconut milk is the creamy, opaque liquid that you extract after blending coconut meat with a small amount of water. It is sweet, mild in flavor, and deliciously rich.

    You can use it as an alternative to dairy if you're sensitive to compounds such as lactose or casein, and it also has a long tradition of use in Asian and South Pacific cookery.

    How is it made?

    Coconut milk is fairly easy to make at home, and the process for both commercial and homemade versions begins the same. You start by separating the coconut flesh from the husk, grating or blending it into small chunks with water, next you'll squeeze and strain the meat and water mixture to extract the milk.

    • Traditionally, you split a brown coconut and then scrape away and reserving the white flesh which is then mixed with water, squeezed, and strained.
    • Commercial coconut milk is prepared through mechanized production which involves separating the white flesh from the husk, and grating or pressing it to extract the milk. Additives such as gums and preservatives are often added to the liquid before it's canned.
    • To make it at home with fresh coconut, you can follow the traditional method by using a coconut scraper, or by prying the white flesh from the coconut husk and blending it with water in a high-speed blender before straining and serving.
    • To make it at home with dried coconut, you'll simply blend dried coconut with hot water in a blender, and then strain and serve.

    Tips for making coconut milk

    Homemade coconut milk needs only two ingredients: coconut and water. And while the process is simple, you'll need some special pieces of kitchen equipment in order to make it such as a high-speed blender.

    • Use mature brown coconuts and reserve young green coconuts for making coconut water and coconut yogurt. It also has a fresher, richer flavor than
    • Use hot water as it will extract the coconut's beneficial oils more easily, resulting in richer flavor and texture.
    • Remove the rough husk, but it's okay if a bit of the brown hull remains. The thin layer of brown hull that surrounds the fresh coconut meat has no impact on flavor or texture.
    • If you make it regularly, invest in a coconut grater as well as a coconut drill. They're super affordable and the traditional tools of choice.
    Rate this Recipe
    5 from 2 votes

    Coconut Milk Recipe

    Homemade coconut milk is rich, sweet, and delicious. It has a subtle coconut flavor, and tastes fresher than canned. While you can make coconut milk from dried coconut meat, using a fresh brown coconut results is worth the effort - resulting in richer flavor.
    Prep Time10 mins
    Total Time10 mins
    Servings: 1 quart
    Print Save Recipe Saved!

    Ingredients

    • 1 large brown coconut
    • 1 ¾ cups hot water

    Equipment

    • coconut drill
    • hammer
    • High-Speed Blender
    • Cheesecloth
    • Fine-mesh Sieve

    Instructions

    Preparing the coconut

    • Pierce the eyes of the coconut with a coconut drill or a screwdriver, and then invert the coconut over a small pitcher to allow its liquid to drain.
    • Next, cover the coconut with a kitchen towel, and hit it with a hammer along its equator. Uncover the coconut, and pry the flesh out of the husk with a sharp knife or spoon, and then set it in a high-powered blender.
    • Pour the reserved coconut water plus 1 ¾ cups hot water over the coconut milk, and then blend until smooth.

    Straining the coconut milk

    • Place a fine-mesh sieve over a large bowl or another container, and then line the sieve with cheesecloth. Pour the coconut slurry into the lined sieve, and then press it firmly to extract as much liquid as possible, discarding the solids or reserving them for another use.
    • Transfer the coconut milk to a quart-sized jar, seal tightly, and then transfer to the fridge where it will keep about 4 days. Shake well before using.
    Tried this recipe?Mention @nourishedkitchen or tag #nourishedkitchen!

    Variations

    Use dried coconut by blending 2 cups dried, unsweetened coconut with 3 cups hot water. Next, follow the steps for straining listed above.

    Add dates for sweetness. While homemade fresh coconut milk is naturally sweet, you may wish to sweeten it further by adding 2 to 3 pitted dates to the coconut meat in the blender. Then, strain as you normally would.

    Add spices such as vanilla, cardamom, or cacao. If you'd prefer to give a little lift and flavor to your coconut milk, you can blend vanilla bean, cardamom, cacao, or other herbs in with the coconut, straining as you normally would.


    Give these coconut recipes a try next:

    • Coconut and Roasted Pear Tartlets
    • Garam Masala Chicken Curry
    • Coconut Pumpkin Bars
    • Coconut Flour
    Previous Post: « Majoun
    Next Post: Coconut Yogurt »

    Reader Interactions

    Comments

    1. pix says

      July 25, 2013 at 12:34 pm

      after piercing the "eyes" of the coconut and draining the water, pop the whole coconut into the freezer for couple of hours. Make it easier to crack open with hammer and the white flesh could be prised out much easier.

      Reply
    2. Kristyn says

      November 03, 2012 at 8:27 pm

      5 stars
      I used this tutorial with great success!! Thank you so much. Can't wait to do it again!!

      Reply

    Leave a Reply Cancel reply

    Your email address will not be published. Required fields are marked *

    Recipe Rating


    Primary Sidebar

    Hi, I'm Jenny! I'm a nutritional therapist, herbalist and the author of three natural foods cookbooks. You'll find nourishing bone broths, simple herbal remedies and loads of fermented goodness on this site.

    More about me →

    Popular Posts

    • The Ultimate Guide to Bone Broth
    • Sour Pickles
    • Homemade Sauerkraut
    • How to Make CBD Oil
    • Water Kefir
    • Ginger Bug

    Recent Posts

    • Cannabis Honey
    • Strawberry Tart
    • Fermented Jalapeños
    • Carrot Leek Soup
    • Fermented Carrots
    • Bergamot Orange Syrup

    Footer

    ↑ back to top

    Explore

    • Nourishing Recipes
    • Broth
    • Fermented Vegetables
    • Fermented Drinks
    • Herbal Remedies
    • Sourdough

    Seasonal Cooking

    • Spring Vegetables
    • Spring Fruits

    Connect

    • Start Here
    • About
    • Contact
    • Facebook
    • Pinterest
    • Instagram

    Privacy Policy + Affiliate Disclosure + Copyright Notice + Accessibility

    Copyright © 2021 Nourished Media LLC. All rights reserved.