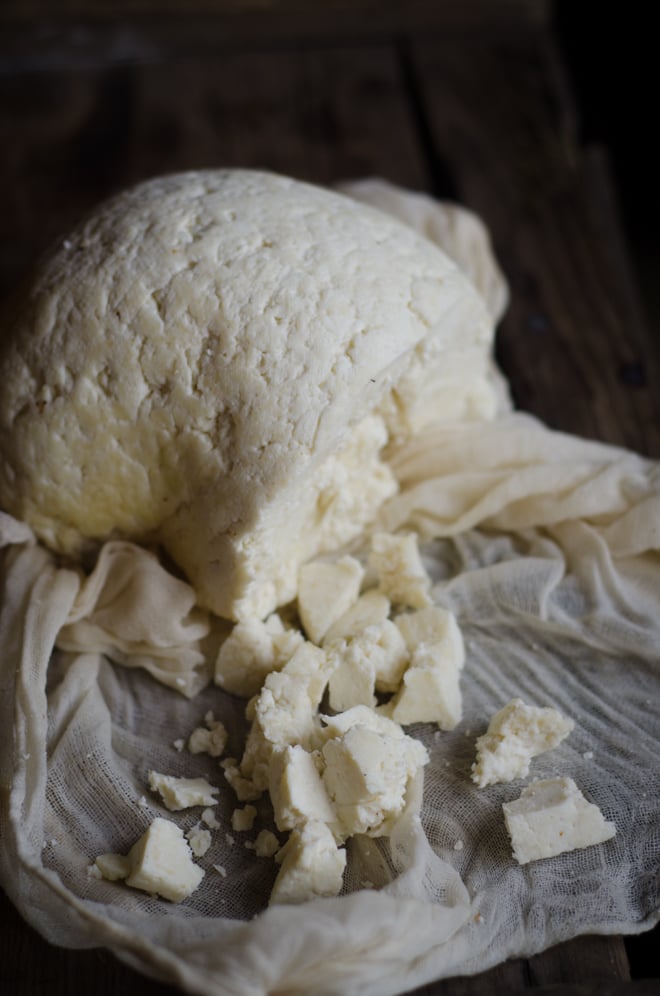
Each week, from April through November, we pick up 4 gallons of fresh, raw milk from our local dairy. We like to visit the farm that houses our milk cows - all doe-eyed guernseys and jerseys with their pale tan-colored coats and their soft muzzles. Like many traditional foods enthusiasts, my family belongs to a herd share; that is, we collectively own an interest in a small herd of grass-fed cows, and as the owners of the cows, we're entitled to their milk.
It started slow - a small share that provided about a half gallon a week, then progressed to 1 gallon, then to 2 and now to 4. Dutifully, each week, I skim the cream off of two gallons of milk, leaving the other two whole. I use the cream for desserts and to serve with fruit, while using the skimmed milk for homemade raw milk yogurt or for simple homemade farm cheese - sometimes seasoning it with fresh herbs, and sometimes leaving it plain as I do below.

Making Cheese at Home
While making cheese often involves purchasing both starter culture and rennet, you can also make cheese very simply with only heat and something acidic like lemon juice or vinegar, the combination of which will cause the cheese curds to separate from the whey. The resulting cheese doesn't offer up the complexity of an aged cheese, but, rather, tastes milky, sweet and mild.
This cheese, a simple and easy farm-style cheese, comes together quickly and is an excellent way of using up excess milk. We always seem to have more milk than we need now that we buy extra to provide for our cream and butter needs. Paneer, a classic Indian cheese, is made the same way - though often substituting lemon juice in place of vinegar. You can use this cheese for snacks, in place of mozzarella, or in casseroles. Children, who can often find aged and complex cheeses too overwhelming for their tastebuds, typically like this simple, homemade farm cheese.


Connie says
Thank you for this simple delicious recipe
Cindy says
This is the second time trying to make cheese, I used a different recipe the first time. This one worked out so much better. I had a little less than 1 gallon of regular store bought whole milk that I needed to used before it went bad so I thought - make cheese. This is not a fancy cheese, it is very basic, but very good. I'm glad I found this recipe, renewed my faith that I too could make cheese.
Ani says
Dont know why everyone calls this "cheese", it has no flavour whatsoever, not even a hint of cheese. So what are some ways to use this, no suggestion on recipes to use it?
Jenny says
Hi Ani, It’s called cheese because it is cheese. Not all cheeses are roquefort, you know what I mean? Also, you can use it as paneer, melt it.
Muriel Jones says
I made this cheese years ago using whole goats milk. I didn't discard the whey tho. I would make scones judging whey instead of butter. Always light and fluffy and lovely flavor.
Muriel
Nancy Winn says
What are good seasonings for the cheese?
Jenny says
Hi Nancy!
Dried chives, thyme, dill and parsley are nice.
Donna says
I halved the recipe but flowed it otherwise and it came out very dry what could be my problem ?
Jenny McGruther says
Nothing. It's a dry cheese.
Carl Cox says
Thanx for the help. Made my own cottage cheese.
Tegan Reed says
yummy & easy - great way to use up a gallon of raw milk that went bad before we could get to it. Used the cheese to make Farmers Cheesecake! yummy!
StaroftheCountyDown says
Amazing and simple recipe. Followed directions exactly except for using apple cider vinegar. Still turned out amazing. Can't wait to try mixing in some herbs and spices. Thank you for sharing!!
Kieran says
Why would one heat the milk first? Seems to counterintuitive if one is looking to imbibe the good bacteria... 🤔
Jenny McGruther says
Because you're making cheese, Kieran. You're making cheese.
Beryl says
It came out tasting wonderful and the texture was just as good. I only used a half gallon, which was just right for 1 person. I will make it again.
Jeff Hughes says
I am new to raw milk, which doesn’t seem to trigger my milk allergy (go figure) so I really wanted to try making cheese. This worked like a champ, no issues and it tastes great. Thanks so much!
—JH
Randi says
I used this recipe and the instructions, but made it on a traeger smoker grill. It turned out fabulous, and very easy to make.
Celsa says
I made my first batch today, it's delicious!
I put some salt and greek oregano.
Angie says
Fantastic and super easy! I halved the recipe and used ACV. Paired it with my favorite sour dough bread and balsamic vinegar. It’s delicious!
Joyce Holwerda says
Very helpful.
I put the salt in before adding the vinegar and the curds have not separated from the whey too well. Could that be the reason?
I just got the temperature to just over 160. Maybe that was the reason. Any ideas?
Thanks
Jenny McGruther says
My recommendation is to make the recipe exactly as written using to the ingredients mentioned.
Adam says
If using raw milk all you need to do is: cool it down overnight then collect cream and leave the milk on the kitchen counter for about two days. Milk is going to curdle by itself. Heat it up to about 45 C. Now you can pour it through cheese cloth folded couple of times. Let it strain to consistency you like. Note, if you heat, the curds to higher temperatures cheese is going to be harder and dry. I prefer 45C. because cheese comes like ricotta, moist and soft. It's really easy.
Jenny McGruther says
What you're describing is clabber, not farm cheese.
Maree says
Thank you for this recipe. I have elways wanted to try and make this.
Andy says
Just made this today with my daughter. We had an extra gallon of raw cow's milk we had. It worked great! Thank you.
Paige says
Could I add a little yogurt or kefir to the whey and leave it to culture? Would it then be suitable for lacto-fermenting veggies? The recipe notes this whey is suitable for soaking grains/flour. Do they not need lactic acid to break down the phytic acid? Thank you in advance!
Jenny says
Hi Paige,
No, they don't need lactic acid to break down phytic acid. You could try to culture the whey and see how it goes.
Shannan says
I tried making it, but used less vinegar than it said as I was unsure of taste. With 2Litres of milk, it only made 91g of cottage cheese... and the whey looks just like normal milk... I used 20g of apple cider vinegar... my question is... can i reheat the "whey", and try again or is it just to be used as whey?
Thank you.
Casey says
I particularly like making paneer in the springtime when the asparagus is fresh-- I use the slightly lemony whey in place of lemon, chicken broth, and cream to make creamy asparagus soup! It's a great paired recipe to use the whey.
Angela Trammell says
What is the procentage on your vinegar. I tried 1 liter of milk with 1/4 cup of 5% white vinegar and it did not curdle at all
Jenny says
Hi Angela,
If your milk didn't curdle, make sure that you're using FRESH milk or low-temp pasteurized milk. UHT milk is not suitable for cheesemaking and will not curdle.
Cbibejs says
Thank you for sharing recipe. I've just tasted the cheese i made with this recipe and it was perfect. Just like i wanted. Like you said it's like mozzarella.
Thank you
Arlene Stone says
Question please: Can I then heat the cheese it a microwave to make mozzarella?
Thank you 🙂
Katie says
At what point would you add herbs and flavorings?
Paula Youmell says
I prefer using my raw, apple cider vinegar. Because this is a cultured vinegar is is usable now for veggie fermentation?
Jenny says
Hi Paula,
No, ACV will not culture your vegetables or act as a starter for them.
Julia says
Could you use the whey to make broth?
Jenny says
I suppose you could, but it would be awfully unpleasant to taste.
Taylor says
Do you think extra cheese could be frozen?
Nuraan says
Hi, this recipe is amazing as I have been experimenting with lemon juice as a substitute for rennet to make my soft cheese, but did not have the correct amounts. Thanks for this inspiring information.
Amelia says
We have access to completely whole milk at the moment and I was wondering if you still need the vinegar if the milk hasn't been pasteurized.
Ken Winston Caine says
How much cheese does 1 gallon of milk make?
William Scheurenbrand says
I made this using apple cider vinegar...It's really good.
Hannah says
I just made this and it turned out great! So delicious!! Does anyone have any favorite things to do with the leftover whey? Maybe some sort of baked goods??
Nuraan says
Hi there Hannah
We use our whey in the baking of our bread which we do everyday. I substitute half of the water amount with whey.
Bread comes out great!
We also had a bit of whey in our banana smoothie.
Hope this was helpful though.
Kim says
Do you use the whole milk or milk that has been skimmed of the cream for this?
I look forward to trying this. We just picked up 3 gallons of raw milk this morning. I may have to get more!!
Thank you!
Kim says
Oops just saw all the comments!
JD says
What amount of cheese does this make? A pound? More? Less? Will this cheese melt for something simple like Mac and Cheese, grilled cheese or on eggs?
Jenny says
I belived it makes about a pound. It's not a particularly good cheese for melting.
Jessica says
Can this cheese be covered with cheese wax and stored to age?
Jenny says
Hi Jessica,
No, this is not an aged cheese so it's best to eat it up right away.
Connie says
I love this recipe. And I freeze the whey in 2 cup batches and use it when baking bread or making pancakes.
Lauren Maiden-Aery says
I want to use an excess of breastmilk to make this cheese as a "first food" for my little man (6 months old). i tried following your directions and got it skimmed but maybe bm doesnt have the fat content to get anywhere near a decent curd? i may give it another try later.
Jenny says
Hi Lauren,
I never tried to make anything with breastmilk, so wouldn't have any advice on how it might differ from cow's milk in this recipe. Theoretically any (mammalian) milk should work. I've heard that breastmilk yogurt makes a good first food for babies. We opted for mashed avocado with our first.
Lorraine says
I am new to raw milk and I need a bit of help please! I have been trying to make cottage cheese by setting the slightly soured whole milk on the counter, skimming the sour cream, and then waiting and rinsing the curds. This morning I went to skim the sour cream- it had been a couple days but I have waited this long before- and there is a thick hard layer on top of what I presume to be whey underneath. What is this and what do I do now? Do I rinse it? Is it cheese? Help Please!!
Jenny says
Hi Lorraine,
Unfortunately, we can't troubleshoot recipes that we didn't develop. Leaving raw milk to sit on the counter will not produce curds, but it will produce clabbered milk.
Lisa says
I am trying to separate whey and curds from raw milk but the 4 days have come and gone and still not separated. I have strained it hoping it would clear but it still looks like milk not whey. Can I leave this strained "milk" out for more time or have I ruined this batch? Any help is appreciated. Thank you!
Jenny says
It doesn't sound like you followed this recipe. Did you?
Carey says
I do not have the means to make my own cheese right now. Are the various raw milk grass fed cheeses that I can buy at the store heated during cheese making process to the point that good bacteria is killed? Thank You
Barbara Gillihan says
I have 2 questions. If using lemon juice in place of vinegar, how much do I use. Our fresh dairy milk is only available until Labor Day... now I will be purchasing milk at the grocery again. Can I use whole homogenized milk from the grocery store? thank you.
Christina says
Is this kind of like cream cheese?
Ariel says
How come this wouldn't work with ultra pasteurized milk?
Jenny says
Because the proteins have been denatured to such a degree that they will not coagulate to form curds.
All says
I made this today (well tried to). It didn't work out. It was like rubber and didn't taste very good. This was my first time so I am trying to troubleshoot. Any help would be very much appreciated. I used regular old whole milk from the store. Not even sure where I would get raw milk or if it is even readily available in my area (Houston). I have never cared for goats milk by the way. From what I read, however the store bought was likely fine. Not sure if something went wrong with the cooking process, did I mess up with the rising, squeezing the excess whey (it was like trying to squeeze hot tea), hung it for two long (I left out for 2hrs) or not long enough? Or maybe something else. Any ideas.
Bil says
Now all we need is a source of organic raw milk.
kate says
I save the whey from my homemade yogurt to use instead of vinegar when making this cheese. I have done it with cow's milk and goat's milk, and both have turned out nicely.
Kris Ness says
We use the whey as a water replacement in bread baking. While our typical bread is the rustic no-knead recipe, the whey gives it a more tender texture.
Renate Callahan says
Hi,
so excited to see this recipe and to hear how many people are doing it at their home. It should be more easily available in grocery stores as popular as it is. I've been doing the same thing for years with local Guernsey milk making the German equivalent to Farmer's cheese, called "Quark" in Germany, or "Topfen" in Austria. Instead of vinegar I use Buttermilk. It takes much longer for the coagulation to work, but it returns a wonderful cheese that is used for a multitude of cooking and baking purposes. I omit the salt for the most part because Quark is the basis for German cheesecakes and the salt flavor is too strong.
Michele says
I am interested in using raw milk as we have a dairy farm locally where I can buy it. However, for all of the wonderful things I read about it there are an equal number of scary things written about it. My pediatrician absolutely advises against it. Thoughts?
Nacrista says
We milk our own cow, and there is not anything scary about it. As far as the Dr. is concerned, have you ever heard one in favor of anything natural? Alot of people are scared of it because it has been drilled in their head all there life that anything raw in the dairy world is bad for you. funny thing is as time goes on they are realizing that the old way is still the best for you in a lot of areas. I'm personally all for the country way of doing things. It worked then and it works now. I make my own butter, cottage cheese, and getting into making hard cheese. I am 37 years old, so I have learned alot from my Grandma, as this was their way of life for along time. It makes me feel good to be able to feed my family fresh diary products instead of the processed store bought stuff.
Frieda says
Hello Jenny. I want to know if this would work with sheep's milk? I do think so as it seemed to work with the goat's milk.
Jenny says
I think it should.
C Spaugh says
We always use non-fat, dry milk powder from Australia for all of our milk products (kefir, Greek yogurt, mozzarella). (Can't get raw milk and wouldn't trust it even if we could.) I'm hoping that it can be used for this recipe too. Has anyone tried it?
Haley says
I used this recipe with raw cows milk (without skimming it). My curds turned out very dry and crumbly. What am I doing wrong? Also, what is the best temperature to start adding the vinegar?
Jayne says
Sounds delish! I hope to make this real soon!;)
Abrar Shaikh says
Thank you
Helena says
just made this, taste wonderful.
what spices can I add to the cheese and when do I add them,
Becky says
I'm making this tomorrow with raw Jersey milk. So do I skim the cream off first? Do I get more cheese if I leave it?? Thanks!
Maria Barker says
You will get a bit more cheese if you use whole milk, but you will still get plenty if you use skim, and keep the cream for butter, ghee, etc. If you leave your milk out overnight, you will reach temperature much faster, and I have found I get more cheese, than if I start with cold milk. Also, whatever acid you choose to use ( just today I had several limes threatening to give up the ghost, so I used freshly squeezed lime juice) don't feel you have to use all of it at once. Instead, stir your milk firmly and with vigour as you slowly pour in your acid, and stop when you see a good, definite separation. Sometimes you will see it with only a little acid, and more would be a waste, and make your whey more acidic than you might like. Other times, you may very well have to use more acid than the recipe calls for. It won't be the same every time. Be sure you let it sit for a few minutes (I always go for ten minutes) as I always seem to get more cheese that way. Make sure every process step is clean, or you will get a foul tasting product. If your cheese ends up rubbery, that only means too much heat for too long was used. The product is still edible. If that happens, spice it up more, shrug your shoulders, and resolve to try again one day. Since I got a good thermometer, that has not happened to me. It happened probably 1/3 of the time when I was just trying to do it by watching the bubbles on the milk.
Best of luck, and most of all, have fun. Dairying is addictive!
Gaby says
Does this recipe only work with raw milk? Could it be done with store-bought milk? Thanks!
Julie O'Brien says
My kids are allergic to corn, so we never use white vinegar. Do you think we could use apple cider vinegar for this recipe?
Betsy says
Haven't tasted it yet, but I wanted to say that even if the milk almost boils over (thanks to a hubby who when he "helps" clean the kitchen 😉 is "go fish" time for me frantically searching for (vinegar) - it still makes cheese...
Valery says
I made this cheese this morning with my 8 yr old homeschooler as a lesson and he loved it!!! It was super simple and he was begging me to make this every week from now on. He said and I quote "I'm going to teach my children how to make this!" Thank you so much for sharing this simple recipe.
Christianne says
Trying this now... I had some extra raw cow milk so figured what could I lose? I didn't separate the cream from the milk, just heated it all. I only heated it to approx. 105 then added the vinegar. Separated great! I have it sitting in my chinois now covered with salt. So excited. Fingers and toes crossed it tastes great. Thanks so much for step by step instructions!
Candace says
I was wondering if white vinegar is an absolute must? Can you use red wine vinegar? I have a garlic red wine vinegar I was thinking would taste good but don't know if the product will come out right. Anyone try it before? Thanks!
Kara says
I would like to know the same!
Tomas says
Why kill all the microorganisms and clump the proteins with heat? I let my raw goat's milk sit at room temperature overnight and the curds separate. Is the heat due to fear of pathogens? If your animals are healthy, and technique for getting milk is clean, no problems.
Jenny says
Because it tastes good. Dairy doesn't need to be raw all.the.time just like it doesn't need to be cooked all.the.time.
Lettie Ramirez Carlson says
i sure enjoyed reading all the questions, replies and comments.I was heating my milk/half&half that I bought discounted and I used my aunt's recipe to add vinegar and tomorrow after all the whey has drained, I will add a little salt and mix it and wrap it in banana leaf and use it as topping for rice cake. Yummy, just like back home in the Philippines. I'd like to see more recipes from you and thanks a lot'''. Bon Appetit
kathy says
I live in Canada and have bought raw milk in the past. Yes you can't buy it retail but it can be purchased independent of a actual grocery store. I bought my eggs and milk from a local farmer. But it would be interesting to have a herd share. Never heard of that. But it makes perfect sense doesn't it?
And for that person enquiring about alergies. I have been able to drink raw milk without any problem, but the pasturized variety always gave me trouble....all that junk in the milk is usually the culperate.
Strangely though my mother (who will be 80 this year) grew up with a milk cow and only started drinking milk about 10 years ago. Hated the stuff all her life. I don't know if it was the cow, or what but she told me years ago that the BARN and everything in it turned her off milk growing up.
Wanda Jackson says
i live in canada where you cannot buy raw milk. can this recipe be used with pasturized milk? we also have the ultrapasturized available.
Julie says
Yes, it can be done with regular pasteurized store-bought milk. I've done it several times. 🙂
Deborah Rowden says
My grandmother was Hungarian and she would set her raw milk out until it clabbered. She would then pour the very soft curds into a clean tea towel over a colander (or on the clothesline!) until it gave up all it's whey. What was left she called dry cottage cheese. Creamy solid little curds of yummy goodness! no heat or vinegar involved. I do they same today with my raw milk! 🙂
Lisa in TX says
Oh, my. So many ideas. Flavored with garlic and basil, stuffed into squash/nasturtium blossoms, and panko fried...or not. Mixed with chopped edible flower blossoms (including garlic and onion flowers, marigolds, dianthus, rose, etc.), maybe a little orange rind and raw honey, and served with gourmet crackers like a cheese ball. Stuffed in jalapeños and wrapped in bacon. Caprese salad. Grilled cheese sandwich and tomato soup. I am SO going to be making this cheese this weekend. 🙂
Jennifer says
Whoa, I am coming to YOUR house to eat, Lisa! 🙂
Kelly says
Thanks for the recipe. Curious how long this cheese lasts in the fridge, and if it can be frozen. My Russian mother in law makes it to use for fillings in some Russian dishes and it would be nice to have on hand.
Julie says
I've frozen this cheese with success. Only I've used it as a ricotta - like in lasagna (or similar Italian dishes), so after being baked the texture doesn't really matter. I know other cheeses can get crumbly when frozen (altho freezing grated cheese doesn't seem to be a problem).
Stacey says
Made this today and it is yummy! I seasoned one batch with garlic and Italian herbs and the other with raw honey. Delicious! Thanks!
DebMarie Phillips says
Thank you for sharing this! I'm very excited to give it a go!
Sara says
You can also make an easy cottage cheese from skimmed milk adding only cultured buttermilk. I culture the cream when we make butter and keep a live culture going in the buttermilk strained off (it's a flora danica culture but you could use store-bought buttermilk), so it's easy to have what we need on hand. Just add cultured buttermilk to your skimmed milk (1/4 cup to 2 gallons), leave at room temperature for 24-36 hours until firm. Cut and then slowly warm the curds over the stove to about 105-110 and hold for a half hour or so, or until curds have firmed. Then drain and rinse with very cold water, drain well, put in a container, salt to taste, and voila. It's SOOO much better that commercial cottage cheese and has the benefits of live bacterial culture.
Jill says
So...I just finished the recipe and realized that I used too much vinegar. Instead of using one gallon milk, I used half but then forgot to use only half the vinegar. Will this affect the cheese?
Sherri Goedker says
Can this cheese be used on pizza? Or is it too wet? If so, what do you use it for? Thanks!!
Gleamer says
Mine tastes like vinegar. I wonder why. Any ideas?
marie says
Will definitely try this !!!
Lisa says
I left the cream in the milk (whoops) and added the salt pre-boil (possibly another whoops). I now have what resembles and tastes like ricotta. Is this because I left the cream in or because I added the salt too early in the process OR a combination of both? Curious...
Sheila says
We get our raw milk in plastic gallon jugs. To skim the cream I actually drain the milk. I loosen the lid, puncture a whole in the side near the bottom. I let the milk drain into a glass jar untill there is only cream left. Then I tip the jug, open the top and pour the cream into a mason jar. You've got milk and cream!
Thomas says
Can you use the whey left over for human consumption?
Julie says
Absolutely! Don't waste it. Freeze it and use it in place of anything that calls for milk, buttermilk, sour milk, or water. (Pancakes, breads, etc.)
Melissa says
Can I use organic pasteurized milk from the store? My husband just asked that I not use our precious (and expensive!) raw milk for my experiment! I think our health food store as some decent brands. I know you said "not ULTRApastueurized" so I assume it's okay, but thought I'd confirm. Thanks for eat another great post!
Julie says
I've successfully made this sort of cheese with regular milk from the store. We don't have a raw milk source (and I think I'd agree about heating up the raw milk!).
BROOKE says
Growing up we used to get 5 gallons glass jars of raw milk that came to a small opening at the top. We used a turkey
baster (for milk only of course) to remove the heavy cream and then the cream before we got to the milk. It works great and you can really control what you remove this way! Hope this helps 🙂
Laura says
In the past, I have made make-shift mozzarella cheese or farmer's cheese by just heating up soured milk sufficiently. Why does this happen?
Also, we get our raw milk in gallon jugs... any tips on how to skim the cream from them? I can't exactly insert a spoon or a measuring cup in it.
Katrina Dial says
Turkey baster?
Sally Oh says
When I want to separate the cream, I pour my milk into a glass 1/2 gallon mason jar, let it sit in the fridge overnight so the cream rises to the top, then using a small ladle, I get the cream out that way.
Angel says
I also get my raw milk in a plastic gallon jug. When I get home I immediately transfer my milk to 4 quart mason jars/ big mouth. I let sit in the fridge over night then I skim the cream off the top. Your ladle will fit in the big mouth jars.
Mera says
I pour my raw milk into a glass "sun tea" jar with the dispenser at the bottom. We drink the milk off of the bottom of the jar until we can see the cream line at the dispenser--then I pour the cream into the mixer and make butter, clean the jar and pour a new gallon in it. It sits front and center in the fridge all of the time.
"Buttermilk" or whey from the butter goes in another container for biscuits, pancakes, corn bread, raised breads or for anyone who wants to drink it--esp when the milk runs out before the week does.
Carla @ Gluten Free Recipe Box says
I've made homemade ricotta cheese, but now regular. It appears to be very similar. I'm looking forward to to trying your recipes. Thanks so much!
Ginger Masters says
I will freeze the whey and use it when I'm cooking rice, or beans. I've also used it when I made my homemade dog food.
Sally Oh says
Ok, I need the recipe for home made dog food now!
Mary says
I have made my own dog food for years. Vets are always amazed at the wonderful condition of my dogs, especially their teeth. I purchase raw ground beaver meat from a licensed trapper. I mix it with rice, raw eggs, cottage cheese and canned veggies, (sometimes frozen) and any leftovers I may have. I make this up in big batches and freeze it, only keeping several days food in the frig at a time. The beaver meat has all the bones ground up in the meat, so the dog gets all the nutrients of the bones. I also feed lots of raw bones on the side as treats.
Katie says
I'm curious - why can't you use the whey in lactofermenting vegetables? Is it because it was heated?
Lynn says
Yes, because it was heated, it's "dead", sans enzymes needed to lacto-ferment anything.
Derrick says
Hi, great site!! 😀
I just wanted to add, after reading all the comments, that if you make the cheese and whey by letting raw milk sit for several days, then the whey is NOT heated thus it could be used for the above fermentation enquired about ... correct?
Sincerely,
Derrick 😀
PS
You all Rock 😀 !!!
Kelsye says
Yumm!!! This sounds amazing. Mix in some fresh herbs and spread it on a slice of toasted sourdough ... Makes my mouth water just thinking about it!
Christy says
I just made this cheese with raw milk using the tutorial above and saved the whey to soak my grains/flour. I put it in a glass jar in the fridge. How long will the whey keep in the fridge?
Julie says
Or freeze the whey to use later. I use leftover whey in pancakes, bread, etc. Anything that calls for milk or water.
Elle says
Jenny, I have to admit that this process fascinates me.
I’ve always wanted to try this, and have considered it many times, but have never had the nerve to go ahead and give it a try.
I think I just never felt like I had enough information to be confident in my ability to make cheese successfully.
Thank you for this post. The step by step instructions are very easy to follow.
I think I am ready to go ahead and give this a try now. Thank you so much for all of your help. I look forward to reading more posts in the future!
Catherine says
I've never made farm cheese. How do you cook/eat it? What recipes could I use it in?
Melissa says
Here's my recipe for chicken salad using farmers cheese, because I live in GA i go to the Tyson people and buy my frozen chicken from them. You can also use fresh chicken you just have to add 1/4 cup of water to the skillet.
5-6 frozen chicken tenderloins
heaping handful of sugarplum or cherry tomatoes (half the small container from the farmers market.)
1/2 cup farmers cheese
1 TBSP mayonnaise
Cook the chicken in a deep skillet, keeping an eye on it so that it doesn't dry out. You WANT to have water in the pan for this whole process. Now would be the time to season the chicken, using light garlic powder, and fine salt/pepper.
Once chicken is fully cooked removed and cube.
Add mayo, cheese, and chopped tomatoes to the chicken in a medium sized bowl, mix well.
Serve on the lettuce half shell and enjoy!
Michelle says
I only heat mine to 130 degrees. I have made different flavors like add garlic powder or dried salsa mix. Also Italian seasoning is very good.
Karen says
You can heat the milk to 104 degrees, leaving it in its raw state which will not kill the good bacteria, and then add the vinegar. It separates just fine. The high heat is not required for separation.
Lolli S says
Could you sub a dairy free milk like almond or coconut?
Jenny says
No. It won't work.
Jennifer Smith says
I I have friends who leave their raw milk out on the counter for several days allowing everything to separate. They call the 2 layers on the top 2 types of cheese (the middle would be curds I think). Is this safe? She gave me some of the top stuff, it smells like parmesan, but I'm afraid to try it.
Kari Carlisle says
Yes, if you're using raw milk from pastured cows, leaving it out in a glass jar for 2-3 days to separate the curds and whey is perfectly safe. I keep both in the fridge after draining the whey in a colander lined with cloth (I just use a cotton cloth). The whey will last several months. I use the whey for drinking and fermenting/soaking.
Linda says
I lived on an organic farm and when we made cheese, we would leave the raw milk in gallon containers on the counter until the curds and whey are separated. The jar lids were not tightened.
We would then pour the contents into a large stainless steel pot and heat on low until you could not keep your hands on the side of the pot.
We didn't boil the milk or add anything. After the milk cooled, we would pour into a cheesecloth and let hang for a day.
Cheese was wonderful!
Sheila says
Do you have to heat it to 180 degrees? That pasteurizes it. I would like to do it raw. Hoping to get some guidance before I try it. Our raw milk is very expensive.
Jenny says
You can't make this cheese without heating the milk.
Allison Garcia says
This looks similar to recipe I have for Queso Blanco/Paneer cheese, but I think this calls for more vinegar...I wonder if it is different. I might try it out and see. I got a cheesemaking kit for Xmas that does aged cheese, but I'm too afraid to try it yet! I know how to make Queso Blanco/Paneer, Mozzarella, and Ricotta. I also made yogurt cheese once but wasn't crazy about it. I also have a recipe for Schiz cheese (Italian) that looks easy. I love cheese!
Lisa says
I am wondering if this is the same as making ricotta cheese? I have made ricotta from organic whole milk (raw milk not available near me yet) using the same process. Is it merely a matter of how much the cheese is drained? Is it just the name? I love your site and all of the information and feedback you provide! Thanks!!
Terry in Oz says
I too am fortunate enough to purchase 10 litres of raw milk per week. Four litres are transformed to daily kefir, and the remaining six are used to make this very sort of cheese. It is however not necessary to bring the milk to the actual boil, and works well when bubbles have formed on the milk surface. The plain white vinegar works and tastes better than the lemon made cheese. For ease and less clean-up I recommend dispensing with the cheesecloth as it is not really needed unless you want a dry harder cheese. The colander is sufficient by itself to drain the curds and does not let chunks through. Sit the colander on a bowl and spoon curds in from your cooker with a seive ladle. After a few minutes of draining I tip the whey from the underbowl, retaining about a mug full. To this I add and dissolve a large teaspoon of himalayan salt, then add this salted whey back to the curds and mash through with a potato masher to bring it back to a moist evenly salted cheese. PS, The trick to evenly clumping curds in the making is to briskly stir the near boiled milk immediately before pouring in the vinegar (25-30ml per litre of milk), and then directly after, reverse the flow direction wth your ladle. Good job, well done!
Donna says
I have always called this type of cheese "paneer". I think that's an East Indian name for it. By the way, your article says you use the cream "to serve with fur". What was that supposed to say?
AnnieC says
Ha ha, I was coming here to ask the same question! I'm not sure I would enjoy cream with fur.
Jenny says
I honestly have *NO* idea what that's about. Really. I was writing it all jet-lagged in the wee hours of the morning. I'm surprised I got anything coherent on the page.
Sally Oh says
IIf you add lemon instead of vinegar, that is paneer. I just watched a video about this at showmethecurry.com... I wanted to find out about farmer's cheese and that's what led me here.
Mya says
You make this with your skimmed milk? We get raw milk and I've never tried to skim the cream, I have wanted to though! This will have to be on my to do list 🙂
Jennifer says
Why can we not use raw apple cider vinegar to make this cheese? I have not used nor considered using white distilled vinegar for anything but cleaning in more than 15 years. I appreciate your site and all you share here:-)
Jean says
I would not use white vinegar for any food preparation either. Something else comes to mind as well. I would only use raw milk and skip the boil process. If that would not work I would prefer not to try this cheese but I can see no logical reason why boiling is necessary since raw milk is so much more healthy. You don't need to fortify raw milk with Vitamins A & D because they are naturally present. Only pasteurized milk needs the fortification because the vitamins and enzymes are destroyed during the pasteurization process. They would be destroyed in the boiling process too.
Kate says
The milk won't separate into curds and whey if it's not heated/boiled...you'd just have vinegary milk instead of cheese curds.
Lynn says
Then what DOES it separate into? I put my raw milk into a glass container, set it on the counter and wait while the curds and whey separate (a few days). Then I pour it all into cheesecloth and let the whey trickle into a jar, while the cheese curds are left in the cheesecloth. What would you call that? Without heat and/or vinegar, I mean. Thanks!
Jenny says
It separates into clabber or Bonny clabber and whey. It is not technically cheese, but Bonny Clabber - a wild-fermented milk product.
Valerie says
I do the same thing! Well, almost. I also put 1/2 of yogurt to 1/2 a gallon of milk, to cilture it. And I do not just leave the milk on a countertop. I place the glass mason jars on top of a heating mat, the one that is usually used for sprouting seeds. That speeds up the process of separation of the milk into...whatever it's called 🙂 We call the final strained product "farmer's
cheese". And that's our staple breakfast
Rochelle says
That's yogurt. Also yummy 😉
Rob says
We call that cooking at room temp for a natural separation
Nacrista says
That is how my Grandma makes Cottage cheese.
Dawnann says
Interesting point you brought out! I am going to consider this. It will cut my cheese making time spent by a long shot! I have both raw cow and goat milk and a excess of it. I boil it and then add ACV (apple cider vinegar) but I will try the cold method.
Brenda says
I didn't see any reply to this q, it's the same thought I had. Did you try it and how did it go?
J'Marinde Shephard says
I am wondering if this would work with coconut milk kefir or almond milk - - or coconut milk creamer? I am severely dairy allergic, as well as gluten and soy. Thanks for any help you can offer.
Time says
Some people find that raw, A2-cow milk is completely tolerated by and even heals their strong milk allergies.
Pasteurized milk is often both adulterated through heating and homogenized, which can adulterate the milk fats.
Many people who are supposed to be "dairy intolerant" tolerate raw milk very well or thrive on it.
Perhaps do some more research?
Alice says
Yes ! Everyone in my family can tolerate store bought milk except my 18month old. Luckily we have moved to an area close to a dairy where I now buy raw milk straight from the farmer and she has no problems with it. Great for the family too 🙂
Jessi says
I can second that!
Monica says
My sister has severe reactions to cow milk, but does perfectly well with raw goat milk!
Judy says
I grew up on raw cow's milk, but always had stomach aches, it wasn't until I got to college that I learned I was lactose intolerant. I switched to raw goat's milk, no problem. raised our 4 children on raw goat's milk. After years of drinking the goat's milk, I started drinking the cow's milk and I had no problem. The goat's milk may have healed my intolerance.
Sara D says
This sounds great! I might try it this weekend!
Sherri @The Well Floured Kitchen says
This looks simple and delicious. I have all the supplies to make hard cheeses, but sometimes I just feel overwhelmed to deal with aging them correctly. This I can handle, it seems similar to homemade ricotta, which I have made. I wish I had a great supply of raw milk, unfortunately we are stuck with organic gallons from the grocery store.
Janira says
I can't wait to make this. Sticking to real food, what type/brand of white vinegar do you recommend?
Jenny says
I often use spectrum. I think that's it.
rachael says
Hello, we prefer not to use white vinegar in anything. Can we use apple cider vinegar instead? Thanks!
Sueathome says
I also don't use white vinegar. Maybe lemon. Assuming it the acid that's needed.
Dawnann says
I use the same exact recipe for my raw goats milk except after it boils I don't turn it to low heat, but I actually just turn it off. I don't know if it makes a difference. And I use Apple Cider Vinegar. I get the Organic brand at Fred Meyer. I believe it is called Braggs. And it comes in a quart sized glass bottle. Shake before each use. I try to steer clear of white vinegar because most of it is made from genetically modified corn, unless it clearly states non-GMO on the label. The 365 White vinegar brand is non-GMO and we get it at Whole Foods Market. Happy cheese making!
Mary P. says
I have been wondering about the source of white vinegar, but have not taken the time to research it. Thanks for the tip of it being most likely from GMO corn. I am an anti GMO gal.
Amanda says
planning to try this soon, we just joined a herd share as well. I'm wondering though what would be the benefit of soaking the grains in the whey since it wouldn't be a cultured product?
Brittany says
Amanda,
You're right, it would not make a cultured product. However, a lot of people use an acidic medium for soaking grains before cooking them to make the grains more digestible. I'm sure Jenny has an even more eloquent explanation of the hows and whys. 🙂
Jenny says
Brittany is correct - it doesn't matter if you're using a cultured dairy product to soak; rather, acids help to deactivate phytic acid.
Trina says
Hi Just wondering what country your in for herd sharing.
Karen Bradford says
USA. It's only legal in 13 states (I think) to buy raw milk unless you do a herd share or buy it for pet consumption. The FDA has their hand in everything to make money ????
Alex says
Do you have any experience with using goat's milk to make this style of cheese? I've always had success with cow's milk. However, the one time I tried it with goat's milk, I just couldn't get the curds to separate from the whey. This despite adding additional acid and cooking longer (I may have eventually let it go to 20 minutes or so)...
Abby says
I make it with raw goat's milk. Heat your amount of milk to 180 (or a little higher) for 10 minutes -- then get the milk moving with a stainless steel spoon while you slowly add the vinegar. Add enough vinegar to see the separation start. Let it sit for awhile -- this seems to help too. Then pour through a colander (cheesecloth if you like). My curd is usually sufficiently solid that a mesh stainless steel wire colander catches it. I find the cheesecloth too hard to clean. I do not rinse the curd. I let the colander drip (on top of a tall stock pot to catch the whey) for up to an hour. Sometimes it needs a knife cut through it to help let a puddle of whey off the top. -- THEN.... you can salt it to taste, add spices that you like, or fry it in slices with a little salt on top. Yum. I have neighbors ask me to make this cheese for them.
Alex says
Thanks much. I'll give that a try.
Kristi G says
I thought you needed whole milk to make this... You skim your raw milk? Also, my raw milk comes in a regular carton. Does yours come differently? How do you skin it !?
Robin Mitchell says
My milk comes in a glass jar. I dot know what the writer here does but I skim the cream off the top by using a 1/4 cup measuring cup and slowly dipping it into the milk so only the very top layer can go into the cup. This allows me to use the cream for other recipes.
Terri says
You can also skim your milk of cream by putting into a glass tea jar with a spigot at the bottom. Simply fill your container with milk; wait until all the cream settles to the top (typically 2 days); then, you can drink the milk as needed and let the cream sit there until the milk is gone, OR after 2 days, drain the milk off until the cream is on the bottom of the jar.
I prefer this method because as I'm dipping the cream from the top, it is mixing with my milk, and I want as much of that precious cream as possible. I buy raw milk; bring it home and pasteurize it (my preference); then skim it or leave whole for cheese making. Have a great day and enjoy fresh milk! 🙂
Vera Algoet says
That's exactly how we did it when we had milk cows.
Mira says
I just made this with my daughter. Such an easy recipe!
I place the finished cheese in a plastic storage container and add
Italian herbs, chili flakes, Himalayan salt and drizzle extra virgin olive oil over it.
Will stay in the fridge over two weeks.
Delicious over sliced tomatoes or sliced cucumbers! Great on crackers!
Try it on any salad or plain pasta. Bon appetit!
Barbara Gillihan says
that sounds delicious. did you also crumble it before adding herbs etc? is it soft like cream cheese? or crumbly like feta cheese? I would love to try this.
Carol Welch says
What a great idea! I have two jerseys. Will have to try this.
Eric Wolfsbane says
This only works with non-homogenized milk.
Lisa says
Skimmed raw milk is still SUPER rich and creamy! So different from how they make the skim milk you can buy at the store. I think this is why it still works.
Caitlin says
I was going to say the same thing as Lisa. My raw milk comes in big glass jars and even after I've skimmed it (I skim all of them so I can use all the cream), the milk is still so creamy. "Skim" milk from a store has so many chemicals in it, it's insane. Skimmed whole, raw milk is entirely different. I actually use an ice cream scoop because it has the nice long handle, it's slim enough to fit well into the top of the jar, and it has a nice round scoop to get all the cream. I just made this cheese for the first time and it's hanging over the kitchen sink right now. I'm so excited to try it!
Erica says
My milk comes in regular plastic gallon jugs. I use a turkey baster to remove the cream from the top of my milk. Just dipping it in far enough to get the thick cream on top. Another option is stab a whole in the bottom and drain out the skim milk into one container then when you reach the cream switch to another container.
Jane Coles says
Hi
The milk you buy in cartons from the supermarket is homogenised and the fat is suspended all the way through the milk. The stuff you get from the dairy is not and allegedly gives you better results.
Read Hugh Fearnley Whittingstall. It will explain all!
Regards Jane